")
What is Scenic?
According to the official documentation, “Scenic is a domain-specific probabilistic programming language for modeling the environments of cyber-physical systems like robots and autonomous cars. A Scenic program defines a distribution over scenes, configurations of physical objects and agents; sampling from this distribution yields concrete scenes which can be simulated to produce training or testing data. Scenic can also define (probabilistic) policies for dynamic agents, allowing modeling scenarios where agents take actions over time in response to the state of the world.”
Our main goal with using Scenic is the design of Scenarios – not data generation. This blog post explores Scenic – a handy and beneficial tool for specifying what your virtual environment should look like. More specifically, we use flexible ways to place objects into the scene and implement custom characteristics in Scenic.
To build your custom traffic simulation with Scenic, there are 5 steps to take care of. All of the steps follow an example and assume the usage of CARLA, an open-source simulation platform that supports the development, training, and validation of autonomous driving. For more details, check out the post on What is CARLA and How to Use it To Simulate Autonomous Driving.
Let’s look at an example of overtaking to see the steps in a traffic simulation with Scenic. The autonomous car – which we’ll call ego vehicle in this post, overtakes another car and switches back to its original lane.
Step 1: Placing Cars into the Scene
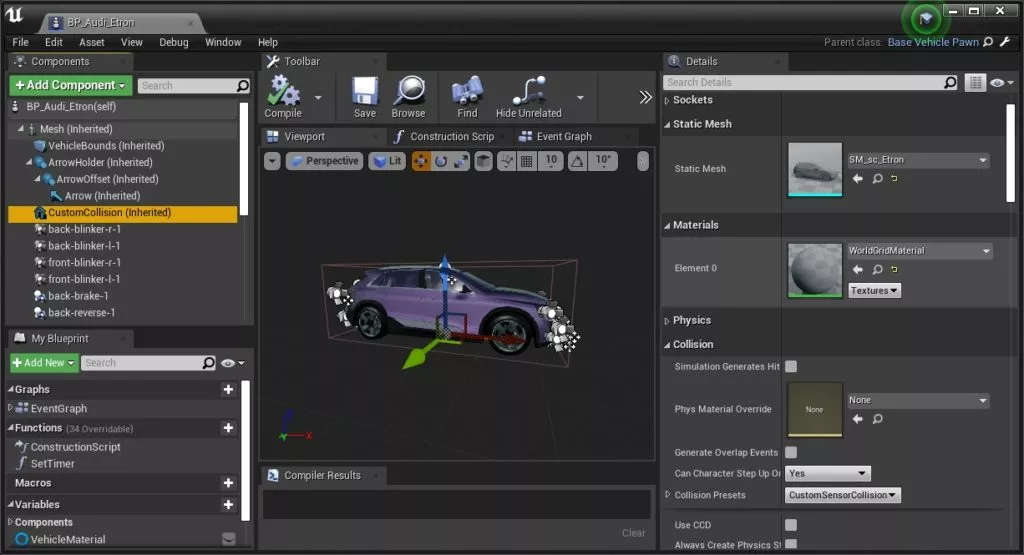
Scenic allows a very flexible way to place objects in the world. The easiest way to do this is the creation of exact Points where the autonomous car, or as we call the “ego vehicle,” can be placed. For example: Car at -50 @ 1.75. In short, Points are defined, and objects are placed onto those. The exact coordinates for a Point can be retrieved in the UE4 editor directly or by starting a scenic script without the --simulate flag.
scenic my_traffic_sim.scenicCode language: CSS (css)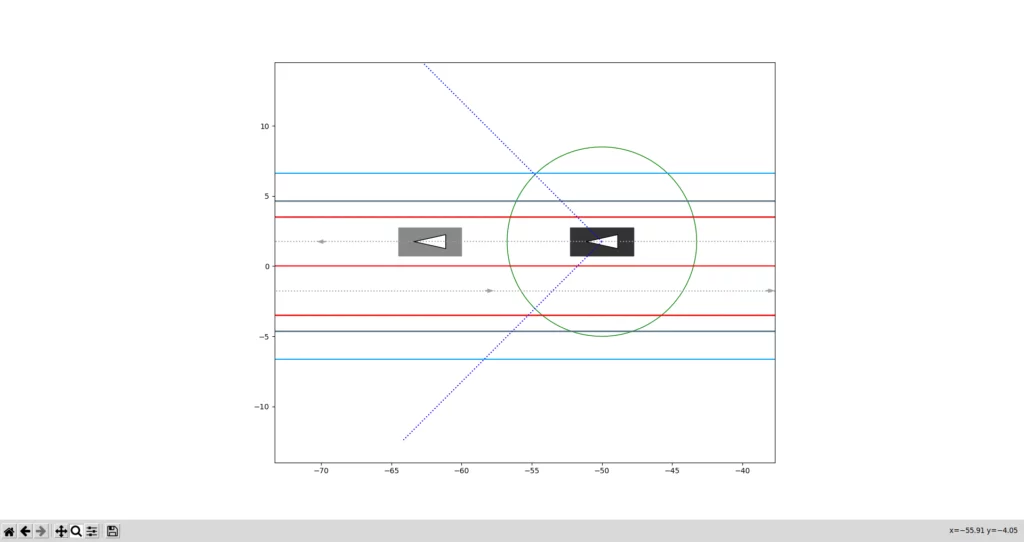
You can see that the coordinates are displayed in the bottom right corner of the view. Press CTL+C to close the view. Let’s place the ego vehicle at a Point defined by its x and y coordinates.
# my_traffic_sim.scenic

EGO_MODEL = "vehicle.audi.tt"

ego = Car at -50 @ 1.75,
	with blueprint EGO_MODEL,
	with behavior EgoBehavior()Code language: PHP (php)
After the ego vehicle is defined, other cars can be placed more easily. They can be defined relative to the ego vehicle with, for example, “ahead of“
CAR_1_MODEL = "vehicle.ford.mustang"

car_1 = Car ahead of ego by (0, 10),
    with blueprint CAR_1_MODEL,
    with behavior Car1Behavior()Code language: JavaScript (javascript)
Scenic is very descriptive, and the natural language makes it easy to understand how the cars are placed.
Accessing a specific road/lane in Scenic is possible because the network has a dictionary structure with keys and values. We use an online OpenDRIVE viewer to quickly retrieve the names of the roads and assign them to variables.
# the network variable can be directly used without special initialization

road4 = network.elements['road4']
road7 = network.elements['road7']
road2 = network.elements['road2']Code language: PHP (php)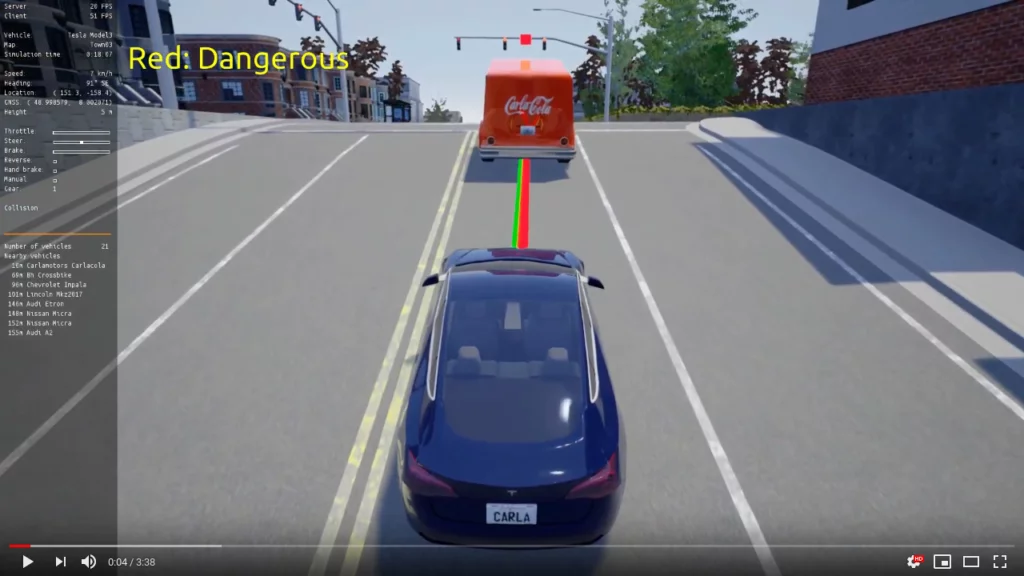
Step 2: Create Custom Behaviors – Example: Overtaking
You can see two other lines in the code block where we placed the car at a specific point.
car_1 = Car ahead of ego by (0, 10),
    with blueprint CAR_1_MODEL,
    with behavior Car1Behavior()Code language: JavaScript (javascript)
Line 2 assigns the car’s 3D model, called a blueprint (Unreal Engine 4 specific). Line 3 assigns behavior to the car. The so-called behaviors are responsible for the actions a car takes. You can use basic behaviors directly, likeFollowLaneBehavior and FollowTrajectoryBehavior. But for more complex behaviors, you need to build your own. This is most likely the case if you want to create a traffic simulation. Behaviors can be triggered with the keyword do.
Here is an example of how overtaking behavior can be implemented.
behavior Overtake(leadCar, target_speed, change_back_distance=10, is_oppositeTraffic=False):
    """
    leadCar: Car object of the leading car
    target_speed: Integer of the target speed to overtake
    change_back_distance: Integer of the distance after overtaking to change back to initial lane
    is_oppositeTraffic: Boolean if there is opposite traffic
    """
    # get the left lane of the current lane section
    leftLane = self.laneSection.laneToLeft

    # blink before overtaking
    take SetVehicleLightStateAction(VehicleLightState.LeftBlinker)

    # follow lane for 2 seconds
    do FollowLaneAndDoNotCollideWith(leadCar, target_speed=target_speed, is_oppositeTraffic=is_oppositeTraffic) for 2 seconds

    # change to left lane for overtaking and turn of the blinker
    do LaneChangeBehavior(laneSectionToSwitch=leftLane, target_speed=target_speed, is_oppositeTraffic=is_oppositeTraffic)
    take SetVehicleLightStateAction(VehicleLightState.NONE)

    # follow the overtaking lane until there is enough distance to the leading car, the car you want to overtake
    do FollowLaneBehavior(target_speed=target_speed, laneToFollow=leftLane.lane, is_oppositeTraffic=is_oppositeTraffic) \
        until (distance from ego to leadCar) > change_back_distance

    # change back to the initial lane and set the right blinker
    take SetVehicleLightStateAction(VehicleLightState.RightBlinker)
    do FollowLaneBehavior(target_speed=target_speed, laneToFollow=leftLane.lane, is_oppositeTraffic=is_oppositeTraffic) for 1 seconds
    if is_oppositeTraffic:
        rightLane = self.laneSection.laneToLeft
    else:
        rightLane = self.laneSection.laneToRight
    do LaneChangeBehavior(laneSectionToSwitch=rightLane, target_speed=target_speed)

    # turn of blinker
    take SetVehicleLightStateAction(VehicleLightState.NONE)Code language: PHP (php)
Step 3: Setting Checkpoints
All cars are placed in the scene, and the behaviors are defined. Now, we want to trigger behaviors in a controlled manner. This assures a more consistent way of simulations. The trigger moment is well-defined, reducing the risk of unwanted and random observations during the simulation. Note that Scenic allows for simulations that are more or less random. The trigger can be implemented with a Point. We call it a Checkpoint. For the presented example, let’s define the checkpoints.
# checkpoint when to start overtaking
CHECKPOINT_1 = Point at -320 @ 5.25

# this is needed to terminate the simulation
EGO_GOAL = Point at -890 @ 5.25Code language: PHP (php)
Checkpoints can be triggered, for example, whenever the car is close enough. Again, the natural language of Scenic makes it clear:
# example of how to use checkpoint to interrupt behaviors
behavior ExampleBehavior():
  try
    # default behavior
    do ...
  interrupt when (distance from self to CHECKPOINT_1) <= 2:
    # default behavior is interrupted
    # self refers to the object this behavior is assigned to
    take ...
    do ...

# this terminates the simulation and is absolutetly required in the scenic script
terminate when (distance from ego to EGO_GOAL) <= 2Code language: PHP (php)
Let’s put together the things coded so far. Behaviors not mentioned in detail are most likely built-in behaviors you can use directly.
### my_traffic_sim.scenic

## CAR MODELS AND MORE
EGO_MODEL = "vehicle.audi.tt"
# it is not clear which unit the speed is given in but we think it is m/s
EGO_SPEED = 10

CAR_1_MODEL = "vehicle.ford.mustang"
CAR_1_SPEED = 10

# checkpoints
CHECKPOINT_1 = Point at -320 @ 5.25
EGO_GOAL = Point at -890 @ 5.25
CAR_1_GOAL = Point at -360 @ 5.25


# define the ego trajectory that is followed
road4 = network.elements['road4']
road7 = network.elements['road7']
road2 = network.elements['road2']
ego_trajectory = [road4.lanes[1], road7.lanes[0], road2.lanes[0]]

## BEHAVIORS
behavior FollowLaneAndDoNotCollideWith(leadCar, target_speed=10, speedier_threshold=15, speed_threshold=12, brake_threshold = 7, is_oppositeTraffic=False):
  """
  leadCar: Car object of the leading car
  target_speed: Integer of the target speed to overtake
  speedier_treshold: Integer of distance to lead car (far away)
  speed_threshold: Integer of distance to lead car (closer)
  brake_treshold: Integer of distance to lead car (too close)
  is_oppositeTraffic: Boolean if there is opposite traffic
  """
  try:
      print("The fast xor furious!")
      do FollowLaneBehavior(target_speed=target_speed, is_oppositeTraffic=is_oppositeTraffic)
  interrupt when (distance from self to leadCar) <= speedier_threshold:
      try:
          print("What a sloth in front of me!")
          do FollowLaneBehavior(target_speed=leadCar.speed + 1, is_oppositeTraffic=is_oppositeTraffic) until (distance from self to leadCar) > speedier_threshold
      interrupt when (distance from self to leadCar) <= speed_threshold:
          try:
              print("I'll better go as fast as this snail!")
              do FollowLaneBehavior(target_speed=leadCar.speed, is_oppositeTraffic=is_oppositeTraffic) until (distance from self to leadCar) > speed_threshold + 2
          interrupt when (distance from self to leadCar) <= brake_threshold:
              print("Ooof, I must brake! Out of the way!")
              brake_intensity = min(max(math.exp(-0.1535 * (distance to leadCar)), 0), 1)
              take SetBrakeAction(brake_intensity)
              take SetThrottleAction(0.0)

behavior Overtake(leadCar, target_speed, change_back_distance=10, is_oppositeTraffic=False):
  """
  leadCar: Car object of the leading car
  target_speed: Integer of the target speed to overtake
  change_back_distance: Integer of the distance after overtaking to change back to initial lane
  is_oppositeTraffic: Boolean if there is opposite traffic
  """
  # get the left lane of the current lane section
  leftLane = self.laneSection.laneToLeft

  # blink before overtaking
  take SetVehicleLightStateAction(VehicleLightState.LeftBlinker)

  # follow lane for 2 seconds
  do FollowLaneAndDoNotCollideWith(leadCar, target_speed=target_speed, is_oppositeTraffic=is_oppositeTraffic) for 2 seconds

  # change to left lane for overtaking and turn of the blinker
  do LaneChangeBehavior(laneSectionToSwitch=leftLane, target_speed=target_speed, is_oppositeTraffic=is_oppositeTraffic)
  take SetVehicleLightStateAction(VehicleLightState.NONE)

  # follow the overtaking lane until there is enough distance to the leading car, the car you want to overtake
  do FollowLaneBehavior(target_speed=target_speed, laneToFollow=leftLane.lane, is_oppositeTraffic=is_oppositeTraffic) \
      until (distance from ego to leadCar) > change_back_distance

  # change back to the initial lane and set the right blinker
  take SetVehicleLightStateAction(VehicleLightState.RightBlinker)
  do FollowLaneBehavior(target_speed=target_speed, laneToFollow=leftLane.lane, is_oppositeTraffic=is_oppositeTraffic) for 1 seconds
  if is_oppositeTraffic:
      rightLane = self.laneSection.laneToLeft
  else:
      rightLane = self.laneSection.laneToRight
  do LaneChangeBehavior(laneSectionToSwitch=rightLane, target_speed=target_speed)

  # turn of blinker
  take SetVehicleLightStateAction(VehicleLightState.NONE)

behavior Car1Behavior():
  """
  car1 follows the same trajectory as the ego vehicle and slows down after the goal is reached
  """
  take SetSpeedAction(10)
  do FollowTrajectoryBehavior(trajectory= ego_trajectory, target_speed=CAR_1_SPEED) until (distance from self to CAR_1_GOAL) <= 2
  do FollowLaneBehavior(target_speed=5)

behavior EgoBehavior():
  """
  the ego vehicle follows its trajectory and overtakes after checkpoint 1 is reached
  """
  take SetSpeedAction(10)
  try:
      do FollowTrajectoryBehavior(trajectory=ego_trajectory, target_speed=EGO_SPEED, turn_speed=EGO_SPEED)
  interrupt when (distance from self to CHECKPOINT_1) <= 2:
      take SetVehicleLightStateAction(VehicleLightState.NONE)
      do Overtake(car_1, target_speed=EGO_SPEED*1.2, is_oppositeTraffic=False, change_back_distance=10)
      FollowLaneBehavior(target_speed=EGO_SPEED)

## DEFINE CARS
ego = Car at -50 @ 1.75,
  with blueprint EGO_MODEL,
  with behavior EgoBehavior()

car_1 = Car ahead of ego by (0, 10),
  with blueprint CAR_1_MODEL,
  with behavior Car1Behavior()

# terminate condition
terminate when (distance from ego to EGO_GOAL) <= 2Code language: PHP (php)
Step 4: Start Scenic Simulation
When running a scenic simulation, Scenic looks for the CARLA ports locally. Please, refer to our blog post “How to set up CARLA on a Server for Remote Access” for more details on how to set up a CARLA server for remote access.
To run the simulation, you need to provide parameters either to the CLI or directly in the scenic script. Add the following to the top of your Scenic script:
## SET MAP AND MODEL
# required
param map = localPath('../to/opendrive_map.xodr')
param carla_map = 'name of your carla map'
model scenic.simulators.carla.model

# optional
param timestep = 0.02
param timeout = 20Code language: PHP (php)
For Scenic specific parameters, simply run scenic --help or have a look here. For CARLA-specific parameters, have a look at the table here. Now you can start your Scenic simulation with the --simulate flag. A window of the rendered simulation should appear.
scenic path/to/my_simulation.scenic --simulate
Step 5: Save Recording (Optional)
We added additional parameters to Scenic to directly save a recording. The height and width of the window are important parameters. The parameter timestep also had a significant influence on the simulation. For more details, we encourage you to read our blog post, “How to Capture a Video of Custom Scenic Scenarios with CARLA. “


