
In this blog post, we discuss our learnings on the map editors available for CARLA, the constraints, and the tools we finally used to create a custom map. But first, let us explain our motivations to create a custom map in the first place.
CARLA comes with a default set of pre-defined maps for the simulation. Most are set in the US or contain a combination of both European and American traffic signs. For our use case, it was essential to have specific traffic situations located mainly in Germany and the US. Unfortunately, this wasn’t available on the existing maps. This meant that we had to create these maps ourselves. For this, we researched available tools to create these custom maps. Although there are several tools available, we encountered problems with most of them. We concluded that only the officially supported map editor, Road Runner, can provide a feature-complete tool for creating road networks and maps.
What Map-Editors are available for CARLA?
Creating a map for CARLA requires two components. The first is an OpenDrive file that defines the road network on a pure data level. The second is an FBX file that contains information about the 3D meshes and textures. While the OpenDrive file is required for navigating vehicles around the road network, the FBX file provides the visuals of the scene. At best, both files should be created in liaison by one tool. If not, a lot of manual work is required to avoid both coordinate spaces from diverting from each other. The approach is not recommended since it is highly error-prone. Nevertheless, we still present editors that are only capable of generating FBX files but no 3D meshes.
In this section, we will discuss some of the tools we discovered and experimented with and share our learnings, challenges, and experiences with the presented editors.
CommonRoad Scenario Designer
The first editor we are looking at is the open-source editor CommonRoad Scenario Designer. This editor allows the creation of road networks but isn’t capable of creating 3D meshes accompanying the network. The editor can import OpenDrive files, OpenStreetMap files, SUMO files, Lanelet files, and their proprietary file format CR, however, it can only export SUMO or CR files. Fortunately, SUMO files can easily be converted to OpenDrive with SUMO netconvert.
Our experience with the tool was that its code is still immature and the editor often crashed making it unviable for us.
Netedit
Another editor we came across was Netedit. The editor is part of the SUMO simulation library. With Netedit it is possible to interactively create a road network in a 2D view. However, similar to CommonRoad Scenario Designer this editor doesn’t allow to create and export 3D meshes and environments. However, it has direct support for exporting OpenDrive files.
As with the CommonRoad Scenario Designer, the tool is open source and viable for generating an OpenDrive file.
While netedit is more mature than CommonRoad Scenario Designer, it still didn’t fulfill our need for a 3D environment. Hence, the editor isn’t our first choice.
Driving Scenario Creator (Blender plugin)
Blender is a free and open-source project which supports FBX exports and animation. With the add-on Driving Scenario Creator, a road network can be created and exported in OpenDrive format. The advantage of using these tools is that both are open source and both OpenDrive files and FBX files can be exported.
An issue with the add-on is that reference points such as the start and end of a road are cached while adding a road. Moving the object around does not update the reference points. Reference points are important because the add-on will, for example, check that exactly four roads are connected to a junction. This restricts 3D modeling immensely.
OpenRoadEd
OpenRoadEd is a tool designed to create an OpenDrive and OpenSceneGraph file. An OpenSceneGraph file can potentially be converted to an FBX file with a plugin for the OpenSceneGraph library.
Unfortunately, the editor did not work as intended. In Windows, the OpenScenceGraph format of the file could not be saved. In Linux, the file dialogs froze when we attempted to open or save any file. Also in the viewer, the camera could not be moved.
RoadRunner
RoadRunner is the recommended map editor for CARLA. Unfortunately, the editor is not free and not open source. It is custom-tailored for CARLA and can generate both the OpenDrive and FBX files. The editor has an intuitive GUI and extensive tools and assets to create a road network and the corresponding environment. It is by far the most feature-complete and mature editor among the other tools presented previously.
Hence, RoadRunner was our tool of choice among all of the tools presented. In the rest of this blog post, we will discuss the features of RoadRunner in more detail.
Using RoadRunner to Create Custom Maps for CARLA
One of the reasons we decided to use RoadRunner was its tight integration with CARLA and its ease to use. The editor provides many tools for generating a map for use in CARLA. These include:
- Road tool: allows generating a road along placed points
- Lane tool: modifies the number and type of lanes of a road
- Junction tool: create and modify junctions between roads
- Lane marking tools: edit lane markings
- Surface tool: create surfaces off the road (grass, parking lots, etc.)
- Prop tool: place various props on the map
Creating maps is straightforward and can be learned via the many tutorial videos provided by MathWorks. In general, it is a good idea to start with the road tool and create the general layout. Junctions are automatically created when roads are crossing each other which facilitates the creation of a custom map, allowing you to fully focus on exactly what you need.
When your basic layout is finalized, the lane tool can be used to add or modify lanes of the road. For example, we would use the lane tool to turn a normal two-way road into a highway by adding lanes in each direction and adding a buffer lane in the middle of the road. We can also use the tool to add turning lanes at junctions.
In this step, let’s use the surface tool to add vegetation around the road network. We can do this by drawing a circle around the roads and RoadRunner will automatically fill up all of the gaps with our chosen texture.
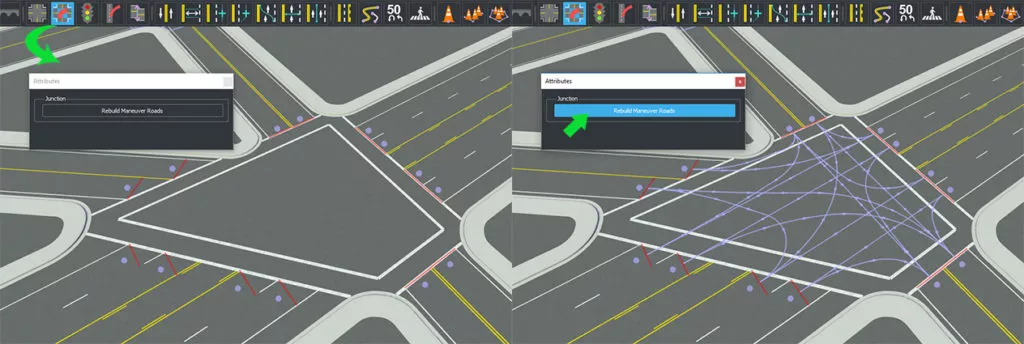
Now we can modify the junctions we generated and specify what lanes are connected, i.e., what the allowed turning maneuvers are. We use the junction tool for this task. We just select the junction we want to edit and connect or disconnect lanes. Assume we want to have three lanes going into a junction. We want the left lane to only allow a left turn, the middle lane to only allow going straight across the intersection, and the right lane to only be a right turn. By default, the junction should have all lanes connected. Thus, we select the junction with the junction tool and simply delete connections until the left lane is only connected to the road to the left, the right lane is only connected to the road to the right, and the middle lane is only connected to the road going straight.
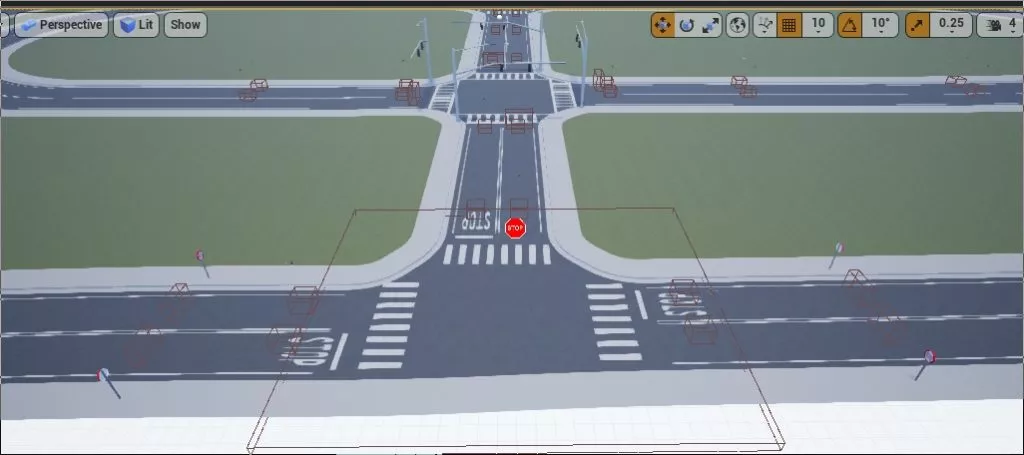
After customizing lanes and junctions, we can edit lane markings. With the lane marking tool, this task is simple. Just choose a lane marking texture from the material browser and drag and drop it onto a lane marking. Additionally, lane markings can be shifted or merged into other lane markings – for example, to create a zipper merge.
Finally, make sure that there are no OpenDrive problems (requires registration to access the information). This is easy to check by navigating under the tab “Tools”. RoadRunner can do a geometry issue check, which will visualize and list all geometry problems. In our experience, such problems were mostly caused by lane markings merging into each other. If RoadRunner does not identify any issues, you can place props along the road. In our experience, it might be better to use them in Unreal Engine later on (see our other blog post) to minimize issues with exporting the map. However, the placement of traffic signs should be done in RoadRunner itself to ensure they are registered in the OpenDrive file. For traffic signs, first, a post needs to be positioned and then a sign can be attached.
Once the map is finished, we have to export it for use within CARLA. However, this step requires extensive consideration and exceeds the scope of this post. Thus, we created a separate blog post about exporting a RoadRunner map.
Assuming that we succeeded in importing our custom map into CARLA, the next thing we want to cover is how to load it up and test it out.
Using your Custom Map in CARLA
The next step is to try out our custom map. For this, we assume that the map has already been successfully imported into CARLA (see our blog post for assistance with this task) and that the CARLA server is running. If the source version of CARLA is used, the server can be started by simply clicking play in the Unreal Engine Editor. If there are issues setting up the server, please take a look at this blog post that covers this topic.
Thus, our objective right now is to load the map, drive around, and see if nothing got lost in the import process. Making a simulation run on the CARLA server requires the CARLA Python API on the client side. So if the server runs CARLA 0.9.13 every client has to install the Python API via pip install carla=0.9.13. Make sure that the server and client versions are identical.
First, we need to switch the map on the CARLA server such that we can drive a car on the new map. For this reason, we use the config.py provided here in the CARLA repository. If the server is running on localhost we simply run
<code>python config.py -m <Name of custom map></code>Code language: HTML, XML (xml)If the server is not running locally we also have to pass the IP:
python config.py --host <ip> -m <Name of custom map>Code language: HTML, XML (xml)This will change the map on the server. To the best of our knowledge, it is not possible to have multiple maps run in parallel. Hence, clients can interrupt a running simulation by changing the map.
Now let’s take a look at actually jumping into our map and driving a car around. Usually, the Python package pygame is used to create a window, overlays, and control events whereas the CARLA API is used to control the simulation and retrieve a stream of rendered images from the server.
Since setting this all up can be quite time-consuming, it is far easier to rely on existing code to try out our map. CARLA provides a lot of example files on how to do this. Our recommendation is to take the Python code manual_control.py. This script sets up a connection to the CARLA server, creates a window, spawns a car, places the camera behind the car, and lets the user drive around.
When we run
<code>python manual_control.py --res '1280x720'</code>Code language: HTML, XML (xml)a window opens and we should be able to drive around our newly created map. Nevertheless, two issues can appear: connection bandwidth and GPU power. Both of these issues cause the video feed to judder.
Unfortunately, there is no sophisticated compression happening when images from the server are streamed to the client. Hence, receiving the CARLA feed can require a lot of bandwidth. In that case, it can help to reduce the resolution. Instead of using 720p like in the example above any lower resolution can be passed.
The other problem can be caused by a GPU that is not powerful enough to render CARLA at the highest settings (Epic preset). To solve this issue restart the server with the preset Low.
Summary
The predefined maps in CARLA are available and free to access and use. There are several towns that can be used depending on the simulation you want to perform. If your use case requires custom maps we recommend using RoadRunner, the only map editor which we found to provide a complete tool for creating road networks and the surrounding environments. Creating a custom map comes with its challenges, not only in the choice of the editor but also importing the map is not straightforward. We go into more detail and provide our experience with importing your maps in CARLA in the next blog post in this series.


")